(Originally published by IBM Systems Magazine in November 2015).
In article Community-Developed Dashboard With Node and DB2 the IBM i Dash open source project was introduced.
Since then a handful of additional features have been added. For instance, WRKACTJOB capabilities implemented with WebSockets so you don’t have to refresh your screen. These features are useful but there are a couple glaring issues with the application as it currently stands. First, all communication with the web app is done over an insecure connection (i.e. http vs. https) and there aren’t any authentication mechanisms. This article will address the former by showing how to add transport security (https) to an existing Node.js application, namely IBM i Dash.
I’ve always gained a lot of knowledge by looking over other people’s’ shoulders to see how they accomplish a given task. In this article I will not only produce the secure transport feature, but also describe the steps I took. This often involves developing chunks of working code and then building on it in incremental fashion.
What I knew I’d need first is the ability to redirect people from an insecure URL to a secure one. Most people don’t specify “https://” when entering your domain into the browser. I’m of the opinion that the majority of traffic (if not all) should be sent over a secure line.
Below I have a small Node.js file named twoports.js that contains the code necessary to forward all traffic to a secure port. In this case I don’t yet have an https server up and running. I’ll simply forward from one port (8080) to another (8443) so I can prove to myself that the redirect works. I am using ports 8080 and 8443 because port 80 (default port for insecure http) and port 443 (default secure port for https) are already in use on my machine. They may also be in use on yours. That’s why I accomplished this step with non-standard ports.
—twoports.js—
var http = require('http')
var os = require('os')

http.createServer(function(req, res) {
  var new_loc = 'http://' + os.hostname() + ':8443'
  console.log('new_loc:%s', new_loc)
  res.writeHead(301,
    {Location: new_loc}
  );
  res.end();
}).listen(8080);

http.createServer(function(req, res) {
  console.log('secure')
  res.writeHead(200, {'Content-Type': 'text/plain'});
  res.end('Response 8443\n');
}).listen(8443);
Below we see how to start the twoports.js file as a server with results being conveyed in the browser and the logs being conveyed into the console.
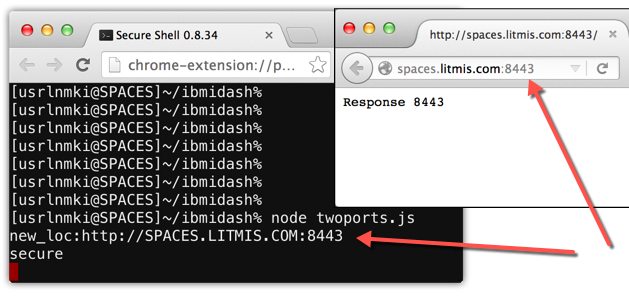
Good, it works! Now on to the next step.
We need to make the IBM i Dash application secure. This means we want all communication from browser to server digitally signed and encrypted with TLS/SSL certificates. To learn more about the differences of TLS vs. SSL you can read this article.
To make this project more simple, we’ll be creating a “self-signed” certificate instead of purchasing one from sources like Verisign. As a side note, and on the topic of obtaining a certificate from a CA (Certificate Authority), you should check out letsencrypt.org.
To generate a self-signed certificate we need openssl or a similar tool. I am using openssl from perzl.org which was obtained via the process described in this article. There are multiple commands that need to be run. The first generates what’s called the private key, as shown below.
$ openssl genrsa -out ibmidash-key.pem 2048
Generating RSA private key, 2048 bit long modulus
............+++
.....................................................................+++
e is 65537 (0x10001)
We take the result of the previous command, file ibmidash-key.pem, and use it on the next command to produce what’s called a CSR (Certificate Signing Request). When you run this command you will be prompted to specify a variety of information like Country, State, Locality, etc, as shown below.
$ openssl req -new -sha256 -key ibmidash-key.pem -out ibmidash-csr.pem
You are about to be asked to enter information that will be incorporated
into your certificate request.
What you are about to enter is what is called a Distinguished Name or a DN.
There are quite a few fields but you can leave some blank
For some fields there will be a default value,
If you enter '.', the field will be left blank.
-----
Country Name (2 letter code) [AU]:US
State or Province Name (full name) [Some-State]:Minnesota
Locality Name (eg, city) []:Mankato
Organization Name (eg, company) [Internet Widgits Pty Ltd]:Krengel Technology, Inc.
Organizational Unit Name (eg, section) []:Litmis
Common Name (e.g. server FQDN or YOUR name) []:spaces.litmis.com
Email Address []:isupport@krengeltech.com

Please enter the following 'extra' attributes
to be sent with your certificate request
A challenge password []:.
An optional company name []:.
The last step is to create the self-signed certificate using the openssl x509 command, as shown below.
$ openssl x509 -req -in ibmidash-csr.pem -signkey ibmidash-key.pem -out ibmidash-cert.pem
Signature ok
subject=/C=US/ST=Minnesota/L=Mankato/O=Krengel Technology, Inc./OU=Litmis /CN=spaces.litmis.com/emailAddress=isupport@krengeltech.com
Getting Private key
Note how files from previous steps are used the the -in and -signkey options.
Now it’s time to write a small Node.js application to test whether our generated files work to make our site secure. Below is file secure.js that brings in the https and fs Javascript modules. The fs (file system) object is used to read in the key and cert files.
—secure.js—
var https = require('https');
var fs = require('fs');

var options = {
  key: fs.readFileSync('ibmidash-key.pem'),
  cert: fs.readFileSync('ibmidash-cert.pem')
};

https.createServer(options, function (req, res) {
  res.writeHead(200);
  res.end("hello world\n");
}).listen(8443);
Use command node secure.js to start the server and point your browser at port 8443 of your IBM i to test this small application. As you can see in the below screenshot the certificate isn’t trusted because the signer (me in this case) isn’t a trusted Certificate Authority (CA) like Verisign.
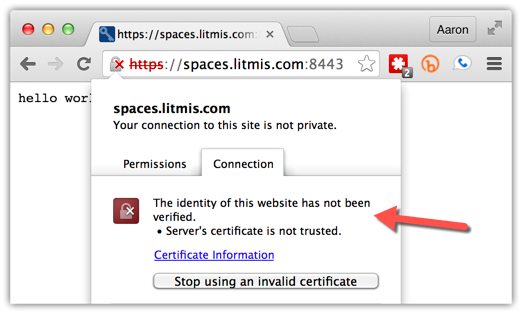
This error is expected because we haven’t installed the CA I generated in the browser. This result also proves that our Node.js site is now sending data encrypted and digitally signed.
The next step is to implement the twoports.js and secure.js features into IBM i Dash’s index.js file. The “git diff” of the changes can be found here. We’ll walk through them in the following screenshots.
First you’ll notice I added a “Usage:” comment at the top declaring how index.js can be invoked with the new configurable port_secure, port_insecure, and host_name options. I figured this would be a necessary feature since the traditional ports like 80 and 443 will most likely be in use by another process. You can see how the the command argument default values are set on lines 17 through 19.
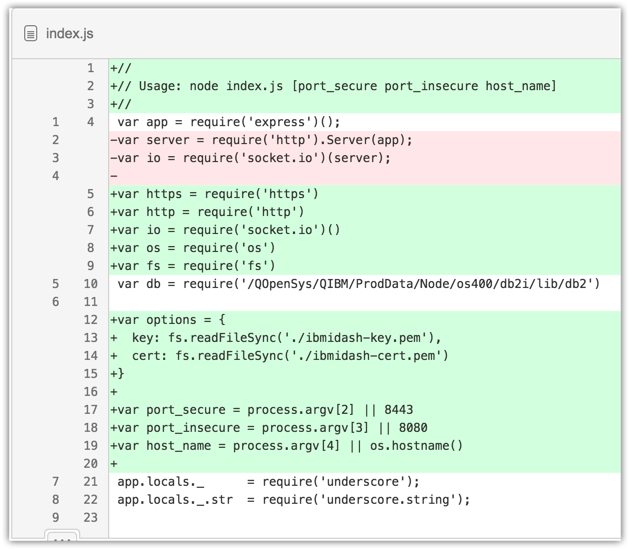
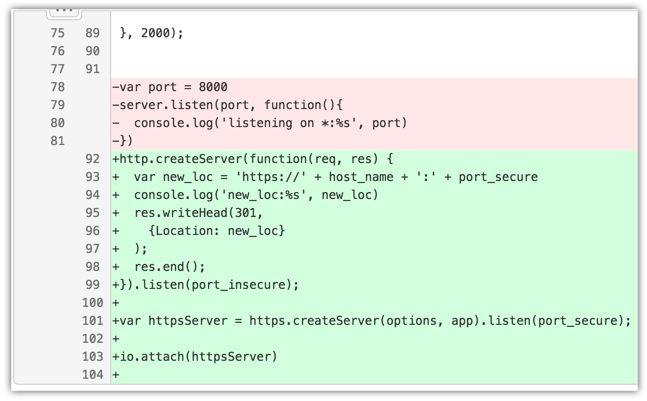
Lines 12 through 15 have the key and certificate files defined just as they were in secure.js. The biggest change happens on lines 92 through 103 where the two http servers are created (both the insecure and secure ones). Lines 92 through 99 are where the insecure http traffic is redirected to the secure https URL. In line 101 you can see the variable httpsServer being declared and occupied with the results of https.createServer() so it can be used for the websocket connection on line 103.
To start up the server you can invoke it without parameters, which will use defaults for the ports and hostname. Or, you can override those options by specifying them as command line arguments, as shown below.
$ node index.js 8444 8081
I hope this provides some valuable insight and enables you to implement https on your own Node.js application. One feature still missing from this application is requiring the user to authenticate with their IBM i profile and password.
Stay tuned for more!
If you have any specific questions, please shoot me an email directly at sales@krengeltech.com