I’m going to take a new approach with this article by first showing how quickly a Ruby On Rails application can be created.
At the conclusion of this article, I’ll go back and fully explain what we’ve accomplished.
To get started, open a PASE shell (i.e. CALL QP2TERM or SSH into your IBM i, as is my preference) and enter the following command:
$ rails new myapp --skip-bundle
      create
      create  README.rdoc
      create  Rakefile
      create  config.ru
      create  .gitignore
      create  Gemfile
      create  app
      create  app/assets/javascripts/application.js
      create  app/assets/stylesheets/application.css
      create  app/controllers/application_controller.rb
      create  app/helpers/application_helper.rb
      create  app/views/layouts/application.html.erb
      create  app/assets/images/.keep
      create  app/mailers/.keep
      create  app/models/.keep
      create  app/controllers/concerns/.keep
      create  app/models/concerns/.keep
      create  bin
      create  bin/bundle
      create  bin/rails
      create  bin/rake
      create  config
      create  config/routes.rb
      create  config/application.rb
      create  config/environment.rb
      create  config/environments
      create  config/environments/development.rb
      create  config/environments/production.rb
      create  config/environments/test.rb
      create  config/initializers
      create  config/initializers/backtrace_silencers.rb
      create  config/initializers/filter_parameter_logging.rb
      create  config/initializers/inflections.rb
      create  config/initializers/mime_types.rb
      create  config/initializers/secret_token.rb
      create  config/initializers/session_store.rb
      create  config/initializers/wrap_parameters.rb
      create  config/locales
      create  config/locales/en.yml
      create  config/boot.rb
      create  config/database.yml
      create  db
      create  db/seeds.rb
      create  lib
      create  lib/tasks
      create  lib/tasks/.keep
      create  lib/assets
      create  lib/assets/.keep
      create  log
      create  log/.keep
      create  public
      create  public/404.html
      create  public/422.html
      create  public/500.html
      create  public/favicon.ico
      create  public/robots.txt
      create  test/fixtures
      create  test/fixtures/.keep
      create  test/controllers
      create  test/controllers/.keep
      create  test/mailers
      create  test/mailers/.keep
      create  test/models
      create  test/models/.keep
      create  test/helpers
      create  test/helpers/.keep
      create  test/integration
      create  test/integration/.keep
      create  test/test_helper.rb
      create  tmp/cache
      create  tmp/cache/assets
      create  vendor/assets/javascripts
      create  vendor/assets/javascripts/.keep
      create  vendor/assets/stylesheets
      create  vendor/assets/stylesheets/.keep
Now change directory (cd) into the new application that was created and run the bundle install –local command:
-bash-4.2$ cd myapp
-bash-4.2$ bundle install --local
Resolving dependencies...
Using rake 0.9.6
Using i18n 0.7.0.beta1
Using minitest 4.7.5
Using multi_json 1.10.1
Using thread_safe 0.3.4
Using tzinfo 0.3.42
Using activesupport 4.0.12
Using builder 3.1.4
Using erubis 2.7.0
Using rack 1.5.2
Using rack-test 0.6.2
Using actionpack 4.0.12
Using mime-types 2.4.3
Using mail 2.6.3
Using actionmailer 4.0.12
Using activemodel 4.0.12
Using activerecord-deprecated_finders 1.0.3
Using arel 4.0.2
Using activerecord 4.0.12
Using bundler 1.7.6
Using coffee-script-source 1.8.0
Using execjs 2.2.2
Using coffee-script 2.3.0
Using thor 0.19.1
Using railties 4.0.12
Using coffee-rails 4.0.1
Using hike 1.2.3
Using jbuilder 1.5.3
Using jquery-rails 3.1.2
Using json 1.8.1
Using tilt 1.4.1
Using sprockets 2.11.0
Using sprockets-rails 2.2.0
Using rails 4.0.12
Using rdoc 4.0.0
Using sass 3.2.19
Using sass-rails 4.0.3
Using sdoc 0.4.1
Using sqlite3 1.3.9
Using turbolinks 2.3.0
Using uglifier 2.5.3
Your bundle is complete!
Use `bundle show [gemname]` to see where a bundled gem is installed.
We ran two commands and now have a fully fleshed out application that includes a web server and is ready to be started with the below rails server command.
$ rails server -p8001
=> Booting WEBrick
=> Rails 4.0.12 application starting in development on http://0.0.0.0:8001
=> Run `rails server -h` for more startup options
=> Ctrl-C to shutdown server
[2015-02-02 09:46:53] INFO  WEBrick 1.3.1
[2015-02-02 09:46:53] INFO  ruby 2.0.0 (2014-11-13) [powerpc-aix6.1.0.0]
[2015-02-02 09:46:53] INFO  WEBrick::HTTPServer#start: pid=3630 port=8001
Open up your browser and type your IBM i IP address followed by :8001, as shown below:

Next let’s create a customer table and generate a full CRUD (Create Read Update Delete) application:
$ rails generate scaffold customer name:string address:string city:string state:string zip:string active:boolean
      invoke  active_record
      create    db/migrate/20150202155257_create_customers.rb
      create    app/models/customer.rb
      invoke    test_unit
      create      test/models/customer_test.rb
      create      test/fixtures/customers.yml
      invoke  resource_route
       route    resources :customers
      invoke  scaffold_controller
      create    app/controllers/customers_controller.rb
      invoke    erb
      create      app/views/customers
      create      app/views/customers/index.html.erb
      create      app/views/customers/edit.html.erb
      create      app/views/customers/show.html.erb
      create      app/views/customers/new.html.erb
      create      app/views/customers/_form.html.erb
      invoke    test_unit
      create      test/controllers/customers_controller_test.rb
      invoke    helper
      create      app/helpers/customers_helper.rb
      invoke      test_unit
      create        test/helpers/customers_helper_test.rb
      invoke    jbuilder
      create      app/views/customers/index.json.jbuilder
      create      app/views/customers/show.json.jbuilder
      invoke  assets
      invoke    coffee
      create      app/assets/javascripts/customers.js.coffee
      invoke    scss
      create      app/assets/stylesheets/customers.css.scss
      invoke  scss
      create    app/assets/stylesheets/scaffolds.css.scss
Run the below command to have the table created in the database:
$ rake db:migrate

== 20150202155257 CreateCustomers: migrating ==================================

-- create_table(:customers)

-> 0.0451s

== 20150202155257 CreateCustomers: migrated (0.0452s) =========================
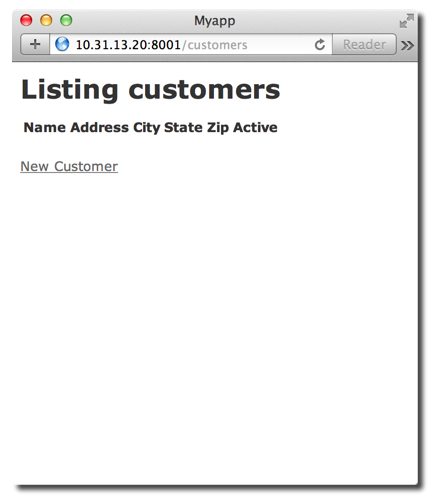
Now bring up your browser to the same page as before and add /customers to the end, as shown below. Click on “New Customer”.
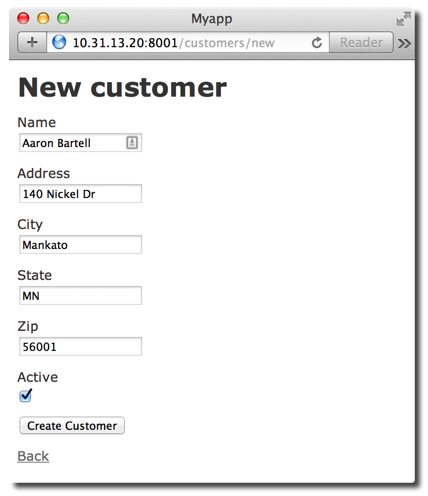
Fill out the form and select “Create Customer”.
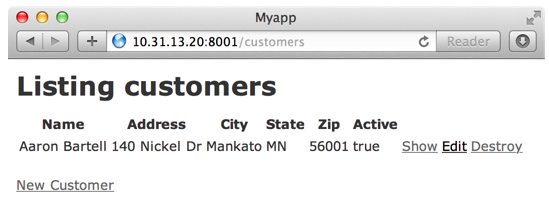
Now go back to the index page (i.e. /customers).
NOTE: SQLite was used as the database in this brief tutorial instead of DB2 for i. Included with PowerRuby is the RAILSNEW 5250 command that accomplishes the initial creation of a Rails app using DB2 for i instead of SQLite.
In brief review we effectively ran the below five commands and now have a completely working, database driven, application.
rails new

bundle install

rails generate scaffold

rake db:migrate

rails server
Wow! That’s neat and cool but what actually happened?
First, the rails new command is used to create the infrastructure of an application. This is a huge time-saver that would normally take considerably longer. One other big advantage is the infrastructure for Rails apps all look the same because they are started with the rails new command. This makes it easier for new developers to quickly dive-in and comprehend the application. Creating a new Rails application is so fast that I often times do it for prototyping so I can quickly test a concept or new Gem without effecting my existing application. Included in this initial setup are configurations for each environment, preconfigured with conventional configurations. For example, in the config/environments/development.rb file we saw in the earlier log has the config.cach_classes setting set to false. This makes development go considerably faster because you don’t have to stop and restart your app to get the latest version of code. This is in contrast to config/environments/production.rb which has config.cach_classes setting set to true – which is a good thing because we shouldn’t be changing code in production.
Next we have the bundle install –local command, part of the Bundler tool, which is used to make sure all necessary Gems specified in the Gemfile file are “bundled” on this machine and available to the application. The –local option is specified because we don’t want the most recent versions of all Gems to be downloaded from RubyGems.org. Why? Because some of the Gems require compilation and that is one of the advantages of the PowerRuby install. When bundle install is run it will create a Gemfile.lock file that details the exact versions of Gems that were proven to work in development. This gives assurances that the production environment will have the same scenario as development. Locking down Gem versions might initially seem like an odd need, but it is necessitated by how frequent Gems are updated – an advantage of an extremely active and progressive community.
At this point we start the web server with command rails server -p8001 and see the aforementioned “Welcome Aboard!” screen. This is possible because Rails includes its very own web server named “WEBrick” – yet another convention over configuration. The Rails folks realized that if you are aiming to develop web apps quickly then you most likely don’t want to be bothered to setup an application server. Even though Rails includes the WEBrick web server you’ll find many instead use the Thin web server because it is more feature rich. Since you always want your development environment as close to production as possible it is wise to use Thin while developing. Switching to Thin is very easy. Simply add the below line to your Gemfile file and run bundle install –local again.
gem 'thin'
Now when you run rails server -p8001 it automatically recognizes Thin is associated with the application and uses that instead. Cool – (and efficient)!
Having the infrastructure of an application generated for you in seconds is a huge plus, but is only the beginning.
Next we see the use of the rails generate scaffold command which is used to create not only a new CUSTOMERS table but also an entire CRUD (Create Read Update Delete) application over that table. The parameters for the scaffold command declare the columns for the table and inherently what HTML fields are declared in the UI layer. Below is a sampling of the output from the scaffold command. First notice how it made use of the existing infrastructure initially created with the rails new command – i.e. directories app/models, app/controllers, and app/views. Not only did it generate everything necessary for the application to run but also infrastructure for unit testing – probably the most oft forgotten aspect of software development. [I raise my hand as a guilty party of not doing as much unit testing as I should].
invoke  active_record
create    db/migrate/20150202155257_create_customers.rb
create    app/models/customer.rb
invoke    test_unit
create      test/models/customer_test.rb
create      test/fixtures/customers.yml
invoke  resource_route
route    resources :customers
invoke  scaffold_controller
create    app/controllers/customers_controller.rb
invoke    erb
create      app/views/customers
create      app/views/customers/index.html.erb
create      app/views/customers/edit.html.erb
create      app/views/customers/show.html.erb
create      app/views/customers/new.html.erb
create      app/views/customers/_form.html.erb
One other thing generated with the scaffold command is what’s called a database migration – “a feature of Active Record that allows you to evolve your database schema over time. Rather than write schema modifications in pure SQL, migrations allow you to use an easy Ruby DSL to describe changes to your tables.”, according to the Rails Guides site.
Below we see the db/migrate/20150202155257_create_customers.rb file that was generated with the scaffold command. Even though this might not look like Ruby syntax (i.e. create_table…) it actually is 100% Ruby. This is what’s called a Ruby DSL, or Domain Specific Language. This is a feature of Ruby it took me awhile to appreciate. I now highly value it because code becomes more concise and fit to the task at hand – in this case the definition of a table.
class CreateCustomers < ActiveRecord::Migration
  def change
    create_table :customers do |t|
      t.string :name
      t.string :address
      t.string :city
      t.string :state
      t.string :zip
      t.boolean :active

      t.timestamps
    end
  end
end
The above database migration file leads us to our next command, namely rake db:migrate. The rake command is a general purpose utility for Ruby that is similar to the make command. Many RubyGems include a Rakefile file that describes various rake tasks that can be invoked by the developer. Incidentally Rails is a RubyGem and when we ran the rails new command the file Rakefile was created. Go here to learn more about how Rakefile relates to Rails.
The rake db:migrate command should be run whenever you deploy to production, whenever you pull other programmer’s changes into your development environment, or when you make database changes yourself – as is the case in this scenario. What does it do? When you run rake db:migrate it will query the schema_migrations database table (auto-created for you the first time you run a database migration) to determine if the DB2 for i database is up to date with what is defined in the migration files within your Rails application (i.e. db/migrate directory). If it finds the DB2 for i schema is out of date it will then run the necessary migration files. As previously mentioned, migration files are Ruby code. This means you can add more code to a migration if necessary. For example, if you originally created a CUSTOMER table with an address but needed to move that to an ADDRESSES table you could use a database migration to first create the ADDRESSES table, migrate the address column data to ADDRESSES, and then remove the address columns from CUSTOMERS.
I hope this gives you a good idea of the Rails advantage!
It’s important to note we’ve only skimmed the surface. For example, while generating an entire C.R.U.D. application is good for some scenarios, there are a number of other generators available that can be used in more granular fashion – like generate a model that doesn’t need any portion of a CRUD app. You’d use the rails generate model command in that case.
On final note, we have a free tutorial you can go through that shows how to add many more features to this application. It will grow your knowledge of Rails and bring further realization of the big benefits.
Contact the Litmis Team to gain access to it!