(Originally published by MC Press Online in October 2015).
What Is IBM Watson?
You’ve most likely heard of Watson at this point. It was the machine used to take on Jeopardy champions a few years ago. And, it WON! You can see a video of Watson competing here. Truly, this was a brilliant marketing play by IBM, but only the beginning. Now Watson is being used for (in my opinion) much more significant purposes, like health care.
When I was first starting my “Watson journey”, I headed over to their developer site to learn what types of API services are available. After a few clicks I found myself at the Watson Services catalog. I perused through it quickly and pondered all the various cool apps that could be created. My middle son, Elliot, is seven years old and deaf. I thought maybe the Speech to Text service would come in handy because my wife and I don’t yet know how well he’ll be able to use the audio of a cell phone. One of the other uses they note is to use Speech to Text to record meeting notes so you end up with something that is easily searchable. Very cool!
A lot of the Watson documentation focuses on doing development through their BlueMix.net tooling. This article will show you how to instead do it right on your IBM i. That’s right, you can access the power Watson for your business with little effort and very reasonable cost! (My account is actually operating off the free version right now).
First things first. You need to install Git on your IBM i so you can use the git clone command to obtain the source code from GitHub. You’ll also need to obtain your public SSH key and paste it into your GitHub profile. I provided instructions in article Git to Bit(bucket) on how to do this for Bitbucket and it is very similar for GitHub.
Let’s get the code!
The below git clone will communicate via SSH to GitHub and download the Node.js source code to the IFS in your IBM i.
$ git clone git@github.com:watson-developer-cloud/speech-to-text-nodejs.git
Cloning into 'speech-to-text-nodejs'...
remote: Counting objects: 1340, done.
Receiving objects:  95% (1273/remote: Total 1340 (delta 0), reused 0 (delta 0), pack-reused 1340
Receiving objects: 100% (1340/1340), 7.09 MiB | 474.00 KiB/s, done.
Resolving deltas: 100% (878/878), done.
Checking connectivity... done.
Checking out files: 100% (122/122), done.
Now go into the directory and list the contents so you can see what’s been downloaded, as shown below.
$ cd speech-to-text-nodejs/
$ ls
CONTRIBUTING.md  LICENSE          app.js           manifest.yml     public
Dockerfile       README.md        config           package.json     src
The next step I took was to review the README.md file of the speech-to-next-nodejs repository, which can be found here in order to learn what normal steps are necessary to install on BlueMix.net. There is a section in the README.md titled “Running Locally” that gives us some direction by first telling us we need to obtain credentials using the cf env <application-name> command. I didn’t want to use their CLI tools so I searched and found this article that details how to obtain credentials for Watson. Follow that article to obtain the necessary Watson credentials and then paste them into file app.js as shown in Figure 1.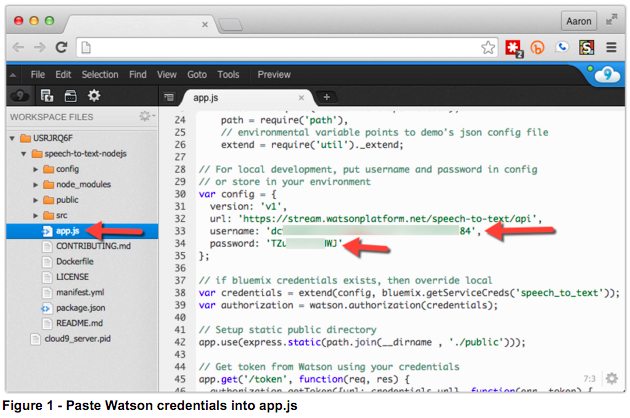
Next we need to install dependent modules for this application by issuing the npm install command while in the root of the project folder. Below it shows the command being run. I’ve clipped the results for brevity sake.
$ npm install
http-proxy@1.11.2 node_modules/http-proxy
├── eventemitter3@1.1.1
└── requires-port@0.0.1

connect@3.3.5 node_modules/connect
├── utils-merge@1.0.0
├── parseurl@1.3.0
├── finalhandler@0.3.4 (escape-html@1.0.1, on-finished@2.2.1)
└── debug@2.1.3 (ms@0.7.0)

errorhandler@1.2.4 node_modules/errorhandler
├── escape-html@1.0.1
└── accepts@1.1.4 (negotiator@0.4.9, mime-types@2.0.14)

body-parser@1.10.2 node_modules/body-parser
├── media-typer@0.3.0
├── bytes@1.0.0
├── raw-body@1.3.2
├── depd@1.0.1
├── on-finished@2.2.1 (ee-first@1.1.0)
├── qs@2.3.3
├── iconv-lite@0.4.6
└── type-is@1.5.7 (mime-types@2.0.14)

express@4.10.8 node_modules/express
├── utils-merge@1.0.0
├── methods@1.1.1
├── escape-html@1.0.1
├── range-parser@1.0.2
├── vary@1.0.1
. . .
Before running the application they recommend using browserify to “compile” all of the Javascript into a single file by using the node run build command, as shown. This is a good idea because it lessens the number of requests the browser makes back to the server to download Javascript resources, thus speeding up your application.
$ npm run build

> SpeechToTextBrowserStarterApp@0.2.1 build /home/USRJRQ6F/speech-to-text-nodejs
> browserify -o public/js/main.js src/index.js
Ok, now we’re set and are ready to start the application, as shown below.
$ node app.js
listening at: 50093
Note I change the port to 50093. You can change your port by scrolling to the bottom of app.js.
Because the experience of this application depends on audio I thought it would be best to create a YouTube video to illustrate the full effect. Click here to watch the video.
Pretty cool stuff, huh?
My mind is buzzing with opportunities on how this API could be used, not to mention the other ones IBM Watson is continually coming out with.
What ideas do you have for the Watson APIs?
Let’s start a conversation and talk through the possibilities! Reach me at sales@krengeltech.com.